How to Get Leadpages Leads into Pipedrive
In this post, we’ll show you how you can get your Leadpages leads into Pipedrive. Enjoy :)
Tools:
- Pipedrive
- Leadpages Account
- Zapier
Duration: About 10 minutes
Step 1: Connect Leadpages to Zapier and Select Zap
In your Zapier account, click Make a Zap, then search for ‘Leadpages’ and click to add the Leadpages App.

Add the New Form Submission in Leadpages Zap and click CONTINUE.

Select your Leadpages account when prompted then click CONTINUE.
Next, select your Leadpage - if you haven’t created any assets in Leadpages yet head over there and create your first one - you need to attach it to this Zap for the process to work.

Click CONTINUE and then test your data source is working correctly.

Step 2: Create Person in Pipedrive from Leadpages Form Submission
Next, configure what you want the Zap to do.

Select the Pipedrive App and the Create Person Action Event.
Click CONTINUE and sign into your Pipedrive account if prompted.

Click CONTINUE.
Under Customize Person click the + button and select First Name and Last Name as the dynamic Name for your contact type.

Select Email and Phone Number for the relevant fields and click CONTINUE.
Step 3: Create Pipedrive Deal with Imported Person
Click the + icon to add another step, then choose the Action Event Create Deal.

Add a Deal title ‘First Name // Leadpages’ (or whatever you want in your Deal title).

Specify what Stage you want the Deal created in by selecting Lead In (Pipeline).

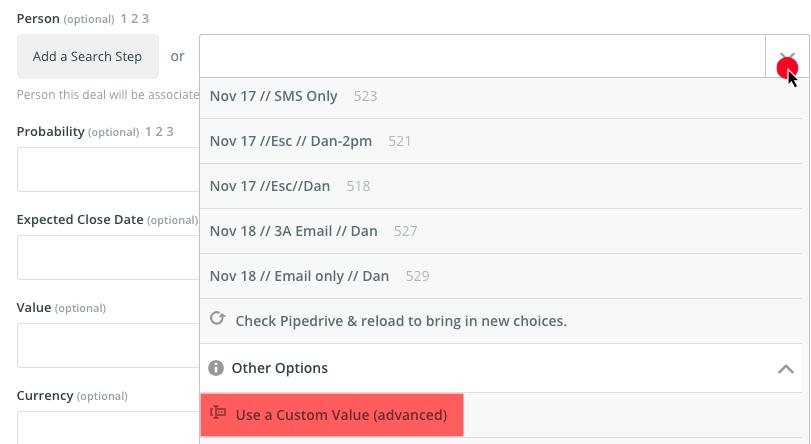
Add the Person you created in Step 2 to the Deal:
Click the Person dropdown arrow and select Use a Custom Value (Advanced).

Then add the Person ID.

Click Save.
Click TEST and CONTINUE.

Confirm all the Deal data is correct. Then you’re all set.
Click the ON toggle.

Your Zap is now live. Congrats!
Step 4: Check Deals are Working
In Pipedrive go to the Deals page and confirm the Zap correctly imported your test deals.

Start your free trial
No credit card required.
Assign leads automatically and free up your time.
